Tile leveling in 4 steps
For pull tabs with a joint width of 1mm - 1.5mm - 2mm - 3mm and 4mm
With the Lantelme tile leveling system, laying tiles becomes professional work, even for laypeople. Level your tiles in thicknesses from 3mm to 15mm or 13mm to 22mm (XXL pull tabs) for natural stone and slabs.
Advantages of the tiling system are:
- Simple, quick and perfect laying of tiles, natural stones and slabs
- Equally suitable for floors and walls
- Clean work guaranteed
- Dirty hands and protrusions are a thing of the past
- Reusable wedges that can also be used as assembly wedges
- Tiles or stone slabs with a thickness of 3mm to 15mm or 13mm to 22mm (XXL spacers)

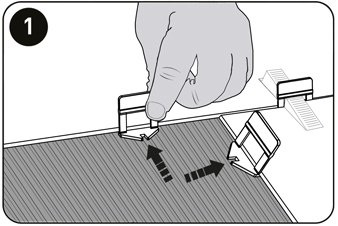
Step 1 Pull tabs
Regardless of where you are working, please prepare the substrate thoroughly for the installation of your tiles. After the tile adhesive is applied, place the first tile in, align it and slide a pull tab under it. Note here whether you are using the standard or XXL pull tabs. For standard pull tabs, we recommend placing the pull tabs at a distance of approx. 10cm measured from the first tile corner. Now press the next tile into the tile adhesive so that the two tiles firmly enclose the pull tabs.

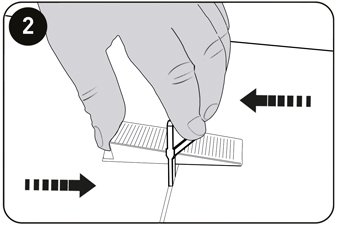
Step 2 Wedges
After you have placed the tile against the adjacent tile, push the wedge through the pull tab by hand. All pull tabs now get their wedge and you can continue with step 3.

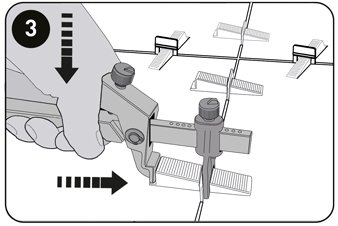
Step 3 Leveling with the tile tongs
The first wedge is now pressed in with the Lantelme tile installation aid pliers until both tiles are level. Adjust the pliers at the set screws accordingly and the wedges can be tightened one after the other.

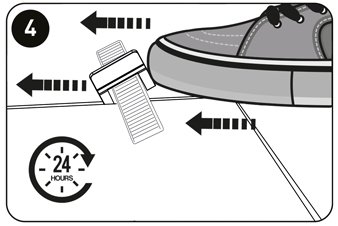
Step 4 Result
At the very end, the pull tabs can simply be removed with the foot or with a rubber mallet in the direction of the joint. The pull tabs break at the predetermined breaking point. After all the tabs have been removed, the joints can be grouted. The wedges can, of course, be reused.
For threaded tabs with a joint width of 1mm - 1.5mm - 2mm and 3mm
With the Lantelme tile installation aid with threaded tabs, leveling tiles becomes a professional job in just 4 steps, even for non-professionals. Level tiles in thicknesses from 3mm to 17mm with a possible joint width of 1mm to 3mm. Lay tiles flat and fast? As a laying aid for large-format tiles and slabs, for wall tiles and floor tiles, you are best advised with the Lantelme tile laying aid.
Other advantages of the threaded tab installation system are:
- Easy, fast and perfect laying of tiles, natural stone and slabs.
- The enclosed washers protect the tiles from scratching
- Equally suitable for floor and wall
- Clean work guaranteed
- Dirty hands and excess teeth are a thing of the past
- Reusable screw caps
- Tiles or stone slabs in thickness from 3mm to 17mm
- Joint widths of 1mm, 2mm and 3mm

The Lantelme Tile Laying Tile with Screw Lugs / Threaded Lugs
For leveling, insert the threaded tabs under the tile. When doing so, make sure that you do not push tile adhesive onto the screw tabs with the next tile.

The Lantelme tile leveling system screw hoods
Screw the washer and screw cap onto the screw tab. The washer protects the tiles from scratches when the hood is screwed on. Tighten the threaded hood until both tiles are leveled (flat).
The Lantelme Tile Laying System Step 3
Allow the tile adhesive to cure according to the instructions on the tile adhesive package and then proceed to Step 4.